Saturday, January 28, 2012

It Just Got Real

Just a quick reminder...help me help cancer survivors and have some fun in Leadville at the same time!  Click here to donate and send a cancer survivor to what might be the most important week of their lives.

Altitude.  It is the natural enemy of endurance sports.  The reason is simple...oxygen.  The body needs oxygen and needs it in great quantities just to function normally, let alone to participate in an endurance activity.  Our bodies can do some pretty great things without food and even without water, but try to go more than a minute or two at rest or even just a few seconds while working hard without oxygen and things go south in a hurry.

What's that got to do with altitude?  Simple, there's less oxygen available due to the air pressure reduction that happens the higher we go.  For every 18,000 feet above sea level that we go, there's half the oxygen available as the previous level.  Most humans will start to feel the effects of altitude at around 5,000 feet...simple things like a little shortness of breath just going up a single flight of steps!

If you've been following this blog, you already know that I'm training for the Leadville Trail 100 MTB Race.  In case you've forgotten, it's 103 miles of distance to pedal, but the real issue is that the entire race happens between 10,000 and about 13,000 feet.  On top of that, there is 14,000 total feet of climbing.  So as you can imagine, that means there are some very serious hills in terms of both grade and distance, and with them being above 10,000 feet, the altitude will definitely be a huge factor.

So what can someone who lives basically at sea level do?  You can either move to altitude and train and live there, or do what some consider to be a better alternative, and that is "live high, train low."  What that means is you find some way to spend at least a third of every day at altitude, and do all your training at sea level (or near it).  The theory there is that you only need about a third of each day at altitude for your body to acclimate to it.  So it boosts the EPO in the blood (yes, the same stuff that performance enhancing drugs help with, except in this case it's completely legal since there are no actual drugs involved) and you get the benefit of that higher level of EPO while training with plenty of oxygen.  That keeps your body from breaking down as easily from the lack of oxygen while working hard.
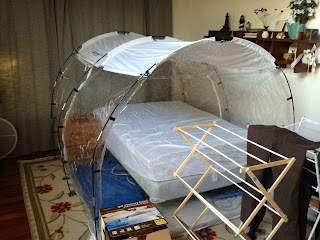
Altitude Tent
So how do you achieve that?  The most common way is an altitude tent that you sleep in.  There are a variety of tent styles, but I chose the one pictured, which is a full enclosure.  The air supply for the tent is an air unit that's in another room to suppress the noise from its compressor.  What it does is scrub a set percentage of the oxygen out of the air that it feeds to the tent.  So it's not exactly the same as going to altitude, but it's the same effect.

So I'll start sleeping in the tent at a simulated altitude of about 3,500 feet, and move from there every week or so on up to 10,000 feet (the limit of my air unit).  Now, my wife refused to sleep in such a contraption, but fortunately there was enough room in our bedroom to setup an additional double bed and put the tent on that.  So we'll be sleeping apart for a while.  Obviously not ideal, but sometimes you have to do some extreme things.
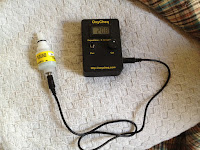
Oxygen Sensor
In my case, this is probably a little more important than for most people who do a race like this, because I seem to be more prone to altitude problems.  I've had altitude sickness just from two days of snow skiing in Tahoe (which is 10,000-13,000 feet as well), and can feel the effects pretty significantly at anything above 3,500 feet. 

Pulse Oximeter
In an attempt to monitor what's going on, I have an oxygen sensor, to make sure my air unit isn't scrubbing too much oxygen.  After some testing, it seems to be working fine and I'll start to use it for the first time tonight.  I also have my own pulse oximeter so I can monitor the oxygen content of my blood.  So between the two, I should be fairly well covered medically.  A plus of the pulse oximeter is that it gives you your pulse easily and quickly, and my resting heart rate is down to 42!  That's pretty good.

Tuesday, January 24, 2012

Zero To Rollers In About Five MInutes

For those unfamiliar, what you see here is a set of bicycle rollers.  You put the back wheel of the bicycle between those two rollers close together, and the front wheel will sit on top of the other one.  When you pedal, the back tire spins both the rear rollers, and the middle one has a belt that connects it to the front roller.  So your rear wheel spins the roller that drives the belt that spins the front roller and thus spins your front wheel.

Only yeah, you have to balance well and keep the bicycle centered.  Those rollers are only 15 inches wide, and even the slightest of movements will cause the bike to move sideways quite a bit.  So any lean makes you move sideways.  Any steering input makes you move sideways.  You can even just move your bottom on the saddle enough to move the rear of the bike and cause the whole thing to move sideways.  Guess what happens if you look sideways?  Yep, you move sideways.  Small breeze?  Move sideways.  Solar flares?  Move sideways.  Okay, you get the idea.

So what's the point?  Training.  Unlike a traditional "trainer" that you mount the rear of a bike in with a resistance unit spinning against the rear wheel, on rollers you're actually balancing yourself constantly.  It's a much more active exercise for the body than just the spinning motion of a trainer.  It also forces one to work on pedal smoothness.  Ultimately, I'm told a rider with a lot of roller experience can ride on these with no hands and never move.

That's ultimately, though.  To start with, one has to learn to ride on rollers at all.  It turns out it isn't very hard to do, it's just hard to convince yourself you can do it.   And I've heard all kinds of stories about funny crashes and such, though I'm told the worry about crashing is overblown.  The thing about rollers is while it feels like you're moving (and can feel like you're moving fast), in reality you aren't.  So a "crash" is really just a "fall over sideways with your legs spinning."  So the key is to not worry about crashing.

Easier said than done.  So as you'll see in the video below, I put big foam crash mats beside me.  I wasn't worried enough to buy these, but I had them sitting around.  The double bonus here is that they effectively raise the floor beside the rollers a good bit.  That's nice because these rollers are about five inches above the floor and thus stepping on and off is a bit of a pain without some sort of aid.  But as you can see in the video, it wasn't that bad thanks to how thick the pads are. 

Also, I want to give a shout-out to Victor.  He convinced me to try rollers, all the while scaring the heck out of me when I saw his rollers.  They are the same as mine except they are only 10 inches wide instead of 15 inches like these.  I still don't know how the heck he rides those!  Aside from convincing me to try rollers, he also built both my road bikes and some of my mountain bike wheels (look him up at his company website, Bicycle Lab).

Now, if you've read this far, you have intestinal fortitude that's off-the-charts.  That's good, because this might be the most boring video in the history of man.  This is video of my first time ever on rollers.  By the end I was to the point I could ride about as long as I wanted to without flying off.  Enjoy!


Sunday, January 22, 2012

Another Milestone

Okay, it's not huge compared to the last milestone, but it is my first ride over 50 miles.  It was pretty epic given that it was very near freezing (I think the temperature gauge is off on the Garmin by a little and it wasn't quite as cold as it said).

This one went a lot better in terms of my friendliness with the saddle.  In that 48 mile ride I really couldn't have gone another minute or two.  In this one, I was still doing okay, though I'm not sure I would have made five hours.  But that said, I rode all of this with my front suspension locked out (and thus doing nothing).  In the 48 mile ride, I only did about an hour of it that way.

Mentally, it was certainly nice having company on this ride.  That 48 mile ride was completely solo.  It's also better when it's not misting on you for large chunks of the ride, but it was really only enough to make having glasses on annoying. 

Anyway, it was a fun ride.  The first thirty minutes are always the hardest, but once I get that first Honey Stinger waffle in me, well, I perk up!  Although by the time we finished today those things were getting so cold they were really hard to chew!

Thursday, January 12, 2012

Nutrition Station

(If you haven't already, don't forget to donate to my effort to help cancer victims!)

Back when we remodeled our house, we added a dedicated theater in the basement.  Outside of the theater we put a kitchenette in so we could prepare snacks and to be able to clean up afterward.  But we don't entertain a ton, and even if we did that's a very infrequent use of that kitchenette.

So now that I'm doing all this crazy training for the Leadville Trail 100 MTB Race, I find myself preparing a lot of nutrition products. While actual meal food is prepared in our normal kitchen (and usually not by me!), any sort of shakes and smoothies are prepared in my nutrition station (ie. the kitchenette).  It turns out I have almost everything I need right there already.  As you can see below, we have a refrigerator, drawer dishwasher, and sink:


The drawer dishwasher is great because it's very easy to load and only half the size of a normal dishwasher.  Since my loads are small, that keeps energy and water consumption to a minimum.  Don't worry, blenders and even the very tall bicycle water bottles fit just fine.  Notice I have a single blender but two actual pitchers for it.  Turns out the cheapest way to do that is just to buy two blenders, so I have a spare motor I keep in the closet.  (Note: That's a normal Braun blender, which I like better than even the incredibly expensive Vitamax type blenders.  Some of these powder based nutrition products will aerate far too easily if the blend speed is high, and units like the Vitamax are just too fast.)  But this way I can wait to wash one until both are dirty, or I can prepare two different drinks at the same time and not have to wash one by hand.

Below you can also see what's on the other side of the sink...a small ice machine:


These aren't very expensive and are half the width of a dishwasher.  You can actually pair one with a small refrigerator that is the same size, too, if you like.  If I had this to do over again, I'd add a half-drawer freezer under the dishwasher, too.  For the frozen stuff I have a small dorm freezer just around the corner in another room, which is only mildly inconvenient.

The ice machine is great because a lot of what I do is fill water bottles and Camelbak systems with ice and water.  The ice the machine produces is relatively small cubes and you just scoop it with a big scoop.  These days most refrigerator ice is half-moon shaped and comes out of a dispenser, and there's simply no good way to get a lot of it into some of these different vessels as efficiently as the small cubes.

So what do I use this for?  My regular pre-workout breakfast is actually a homemade smoothie.  I blend ingredients like spinach, yogurt, milk, orange juice concentrate, a variety of frozen berries and mango, protein powder, fiber powder, flaxseed oil, fresh banana, etc.  My post workout shake is a product called Cytofuse.  Often I'll blend that before my workout after I make my smoothie.  I then put it in a Nalgene bottle and put that in an insulator designed for Nalgene bottles.  These will keep drinks cold in extreme conditions for quite some time, so they're great.  I also use these special caps on the Nalgene bottles if I'm going to be drinking directly from the bottle.  Much less chance of a mess!

Near the kitchenette is a closet, and that's where I keep my nutrition product stash:


I keep all my Nalgene bottles and other bottles in the cabinets above the kitchenette.  All my actual Camelbaks and spare bladders are in the closet you see pictured above.  I can easily hang a Camelbak bladder on the cabinet knobs above the sink for it to dry when I clean those, too.

So while I know most people can't just re-purpose a kitchenette or build one from scratch, I point all this out in case you are remodeling and are an endurance athlete, or in case you do have a similar setup you could be using.  Yes, it's quite a setup, but when you're training six days per week, sometimes multiple times per day, it's really nice to have everything for your nutrition in one neat and organized place.  There are a few tips in here that I hope will help even those who can't do something as self-contained, too!  Oh, and a lot of the above applies to making frozen liquor drinks, too.  Adapt as necessary.

Tuesday, January 3, 2012

Pump up the jam!


No, not the 80's classic by Technotronic.  Thankfully.  No, it's the pump track that we added at the ranch!  This isn't a great video, but Kevin shot it with my iPhone while I rode a little over a lap. 

So, what's a pump track, you say?  Well, it's a small BMX-like track where the object is to ride laps continually without pedaling.  That's right, you can't pedal.  You make the bike go by getting a small start with the pedals (or ride in from outside with just a little bit of speed) and then you use your entire body to pump down the back side of each little hill.  So you're simply moving your body up and down with your legs and arms in rhythm with the small rollers (or hills) so that you are putting energy into the downhill side to generate forward speed.

It's very cool.  And useful, too.  When biking on the trail, you sometimes need to be able to pump in places to generate extra speed, especially in places where the terrain may not allow for much pedaling.  Or sometimes in a race there are places where you can gain some "free" speed on folks who aren't pumping.  I wasn't really cornering with great technique here, but the bowls on the ends of the track are very good for working on better cornering technique, too. 

And ultimately, you can start actually jumping the front side of the rollers and pump as you land down the back side.  All with no pedaling.  So cool, fun, and good for mountain bike skills work!

We've got plenty of dirt stockpiled to add on a little more length, and the plan is to add some other skills features around the pump track in the form of wooden decks, jumps, platforms, etc.  Fun stuff.  Oh, and it works great for racing remote controlled off-road cars.  I'll try to get some video of that soon, too.  And some first person biking video.

Monday, January 2, 2012

Want to run more this year?

So you've made your new year's resolutions and one of them is to run more (or at all!).  But as soon as you do that, the weather turns frigid. It's just not fair, right?!?  But you made the resolution, so you begrudgingly dig out what you think is "just enough" clothing to get the job done.  You know, that fine line between freezing your patootie* off until you warm up and then hopefully not so much that you boil in your own sweat.  It's a tough one.

(* Patootie is a highly technical term, sometimes referred to as your "tuckus", "tushie", or the Englishman's "bum.")

A common method that helps with this is to wear a jacket or sweatshirt that you can remove once warm and then tie around your waist.  This is often referred to as "dressing in layers."  This has its own set of problems (from fashion nightmare all the way to the potential for it falling off and tripping you and causing death-by-faceplant).  Nope, not a good idea.

One possible scenario here is that you push through it with as little as you can stand in the clothing department and avoid becoming a patootie-popsicle.  But you get warmed up, run for a little bit, and then start to get too warm.  You fight through that for a while, maybe do the dangerous sweatshirt-turned-skirt trick, and ultimately change your running route so you can quit early.  Yeah, that's right, you went to DEFCON-SCREW-IT.  So much for that resolution since it's going to be even colder tomorrow.

But there are alternatives.  I've recently started doing what I call "dressing in segments."  Now, I'm fairly lucky in that I seem to have no problem getting the lower half of my body covered in such a way that I don't need to change it during a run.  Thin Smartwool socks are the norm for me no matter the temperature (because let's face it, I don't have to exercise in sub-20F weather in NC very often, if at all).  Anything below 48F or so and I wear CW-X running tights (light insulation), but above that and it's just running shorts.

But it's the upper half of the body that's the troublesome part.  Above 48F and I generally just wear a dri-fit shirt and headband and suffer a little until warmed up.  For 35F to 48F is where the segments begin.  At this point I usually wear a Smartwool short sleeve shirt, insulated running gloves, and Smartwool arm warmers.  On the upper end, I may still wear just a dri-fit headband, but on the lower end I switch to a dry-fit type (or Smartwool) full head cap.  I've recently considered putting a headband in my pocket to switch to if the full cap gets to be too much (which means it's soaked in sweat).  On the upper end, that's all I need.  On the lower end of this range, I wear a fleece vest on top of all that. 

With that setup, I can generally be pretty comfortable at the beginning of a run.  As I get warmed up, generally I notice my hands are starting to sweat and at that point I remove the gloves and put them in my pocket.  Depending on the temperature, at some point my arms begin to get warm.  If it's far into the run, I might choose to push up the warmers a little, but generally it happens early and I remove the arm warmers while running and put those in my pocket.  I usually find a point where I also start to unzip the fleece vest, and even move to unzipping it almost all the way.

But what about below 35F?  At this point I think it's good to have a thicker cap on the head, but carry a thin one to switch to.  I would also probably just go with a long sleeve Smartwool and a thin or thicker sweatshirt depending on just how cold it is.  And the fleece vest over that.  I'll still use the gloves, but often I still need to remove those, even pretty far below 35F.  But at this point the arms are usually fine.

So none of this is rocket science, but the big revelation for some may be the arm warmer trick.  That's something that mostly only cyclists use, but I think they're great for running, too.  And notice that everything I've mentioned should be things you can easily stuff in pockets rather than having to tie things around your waist.  I'm just not a fan of that, but if it works for you, great!

Hopefully this helps you keep that resolution and stay out there running this winter!